I just kicked the tires of Google Cloud NetApp Volumes service and it is pretty slick! This service is delivered by Google Cloud using NetApp ONTAP and has full integration with IAM, Cloud Monitoring, Cloud Logging, Cloud Console, and the Google Cloud SDK. If you need Windows file shares using SMB on Google Cloud then this is the managed service for you!
There is a quickstart guide in the official documentation, but plenty of steps are “left to the reader”. While it’s pretty standard cloud configuration, the devil 😈 is in the details.
To help folks try out this service I’ve documented the steps I took to configure my environment from scratch through to accessing a SMB file share from a Windows VM. All the steps you need including configuring networking and firewall rules, setting up dns, installing and configuring a Windows Active Directory Domain Controller, creating the NetApp Volumes resources, and finally testing from a Windows VM. I’ve also avoided the use of public IP addresses to reduce potential security lapses. While the steps here might not match your production deployment, they will at least show you how to build a working solution.
Here’s what we’re going to build:

Expected time to execute steps: 1 hour
Initialize the project and set defaults
In this section we’ll create a fresh project, associate a billing account, and enable the needed APIs.
Install and initialize the gcloud CLI on your local machine if needed.
Create a fresh project:
$ gcloud projects create smb-20230829 --organization=85556667778Link a billing account:
$ gcloud beta billing projects link smb-20230829 --billing-account=000111-AAABBB-222333Set the default
gcloudproject so we don’t need to supply it on each command:$ gcloud config set project smb-20230829Enable the APIs needed to use Google Cloud Volumes and integrate with Active Directory:
$ gcloud services enable compute.googleapis.com \
dns.googleapis.com \
iap.googleapis.com \
netapp.googleapis.com oslogin.googleapis.com \
servicenetworking.googleapis.com
Create Windows Server VMs for Active Directory and a test client
In this section we’ll create a Windows VMs for our Domain Controller (DC). We’ll also reserve the IP of the DC to ensure it doesn’t change. This is also the time when you’ll want to decide your GCP region, which for simplicity should match the location where you intend to use NetApp Volumes. I’m based in Amsterdam so I chose euorpe-west4 (The Netherlands)
Create the Windows VM. I’ve called the DC
adc1:$ gcloud compute instances create adc1 \ --zone=europe-west4-c \ --machine-type=e2-standard-2 \ --network-interface=stack-type=IPV4_ONLY,subnet=default,no-address \ --tags=msft-adc \ --create-disk=auto-delete=yes,boot=yes,mode=rw,size=50,image-project=windows-cloud,image-family=windows-2022,type=projects/smb-20230829/zones/europe-west4-c/diskTypes/pd-balancedReserve the DC’s in-use IP address so it won’t change.
$ gcloud compute instances describe adc1 --zone europe-west4-c | grep -E "networkIP|subnetwork"
networkIP: 10.164.0.3
subnetwork: https://www.googleapis.com/compute/v1/projects/smb-20230829/regions/europe-west4/subnetworks/default

gcloud compute addresses create adc1 \
--addresses 10.164.0.3 \
--region europe-west4 \
--subnet default
Configure network connection between your VPC and the NetApp Volumes Service
In this section we’ll create a connection between your VPC and the NetApp Volumes service using private service access.
Reserve a static internal IP address range for use by the NetApp Volumes service. I chose
192.168.0.0/24for simplicity:$ gcloud compute addresses create netapp-addresses-default \ --global \ --purpose=VPC_PEERING \ --prefix-length=24 \ --network=default \ --no-user-output-enabled \ --addresses 192.168.0.0Peer your VPC to the NetApp Volumes service using the network range you just created. The command will take a few minutes to complete:
$  gcloud services vpc-peerings connect \
--service=netapp.servicenetworking.goog \
--ranges=netapp-addresses-default \
--network=default
The previous step will result in the network peering
sn-netapp-prodbeing created for you. Next, enable custom route propagation on it:$ gcloud compute networks peerings update sn-netapp-prod \ --network=default \ --import-custom-routes \ --export-custom-routes
Add firewall rules
In this section we’ll add firewall rules needed for our overall scenario.
Add a firewall rule allowing the NetApp Volumes Service to communicate with your Microsoft Active Directory Domain Controller:
$ gcloud compute firewall-rules create allow-netapp-peer-auth \
--description="Allow Microsoft authentication traffic from NetApp peered network" \
--direction=INGRESS --priority=1000 --network=default --action=ALLOW \
--rules=tcp:53,tcp:88,tcp:389,tcp:445,tcp:464,tcp:636,udp:53,udp:88,udp:464 \
--source-ranges=192.168.0.0/24 --target-tags=msft-adc
Add a firewall rule allowing Google IAP connections into the VPC:
$ gcloud compute firewall-rules create allow-google-iap \
--description="Allow RDP traffic from Google IAP addresses" \
--direction=INGRESS --priority=1000 --network=default --action=ALLOW \
--rules=tcp:3389 \
--source-ranges=35.235.240.0/20
Add a firewall rule allowing Cloud DNS to forward requests to your Microsoft Active Directory Domain Controller:
$ gcloud compute firewall-rules create allow-cloud-dns-forwarding \
--description="Allow Cloud DNS request forwarding" \
--direction=INGRESS --priority=1000 --network=default --action=ALLOW \
--rules=tcp:53,udp:53 \
--source-ranges=35.199.192.0/19 --target-tags=msft-adc
Install and configure the Microsoft Active Directory Domain Controller
In this section we’ll install a fresh DC using Powershell, but before we can do that we need to connect with IAP and reset Windows passwords in a few places.
Request Compute Engine to reset the Windows password of our own account to give credentials that will allow us to connect with RDP:
$ gcloud compute reset-windows-password adc1 --zone europe-west4-c

This command creates an account and sets an initial password for the
user [chris] if the account does not already exist.
If the account already exists, resetting the password can cause the
LOSS OF ENCRYPTED DATA secured with the current password, including
files and stored passwords.

For more information, see:
https://cloud.google.com/compute/docs/operating-systems/windows#reset

Would you like to set or reset the password for [chris] (Y/n)?  Y

Resetting and retrieving password for [chris] on [adc1]
Updated [https://www.googleapis.com/compute/v1/projects/smb-20230829/zones/europe-west4-c/instances/adc1].
WARNING: Instance [adc1] does not appear to have an external IP
address, so it will not be able to accept external connections.
To add an external IP address to the instance, use
gcloud compute instances add-access-config.
password: h$+notrealJdid877d
username: chris
Use Identity-Aware Proxy (IAP) to tunnel RDP traffic from your local computer port 8000 to your Active Directory Controller port 3389:
$ gcloud compute start-iap-tunnel adc1 3389 --local-host-port=localhost:8000 --zone=europe-west4-c

Testing if tunnel connection works.
Listening on port [8000].
Use your RDP client to connect to
localhost:8000with your username and the password generated in the reset step 1 above.Open Powershell as Administrator (right click on Powershell and choose run as administrator)
Enable the local administrator and set a password
PS C:\Windows\system32> set-localuser -Name Administrator -Password (Read-Host -AsSecureString)
<input password>

PS C:\Windows\system32> Enable-LocalUser Administrator
Install Active Directory and DNS. Tip: Use a domain name that won’t resolve on the Internet to avoid confusion. For example, I chose
smb.local:PS C:\Windows\system32> Install-WindowsFeature -name AD-Domain-Services -IncludeManagementTools Success Restart Needed Exit Code Feature Result ------- -------------- --------- -------------- True No Success {Active Directory Domain Services, Group P... PS C:\Windows\system32> Install-ADDSForest -DomainName "smb.local" -InstallDNS SafeModeAdministratorPassword: ********* Confirm SafeModeAdministratorPassword: ********* The target server will be configured as a domain controller and restarted when this operation is complete. Do you want to continue with this operation? [Y] Yes [A] Yes to All [N] No [L] No to All [S] Suspend [?] Help (default is "Y"): Y Ignore Warnings. System will restart.Reconenct your RDP client to
localhost:8000but this time using your AD Domain credentials (in my casesmb\administrator) to verify the Domain works properly.Configure DNS request forwarding so that Cloud DNS will forward requests for AD managed zones to it. This steps will ensure that VMs are able to do lookups related to the Windows Domain while still using the default Cloud DNS resolver. Note the
forwarding-targetsparameter is the IP address of the DC:$ gcloud dns managed-zones create smb-local \ --description="Forward requests for the Microsoft AD managed domain" \ --dns-name="smb.local." --visibility="private" \ --networks=default \ --forwarding-targets="10.164.0.3"
Configure NetApp Volumes
In this section we’re going to configure NetApp Volumes using the Cloud Console.
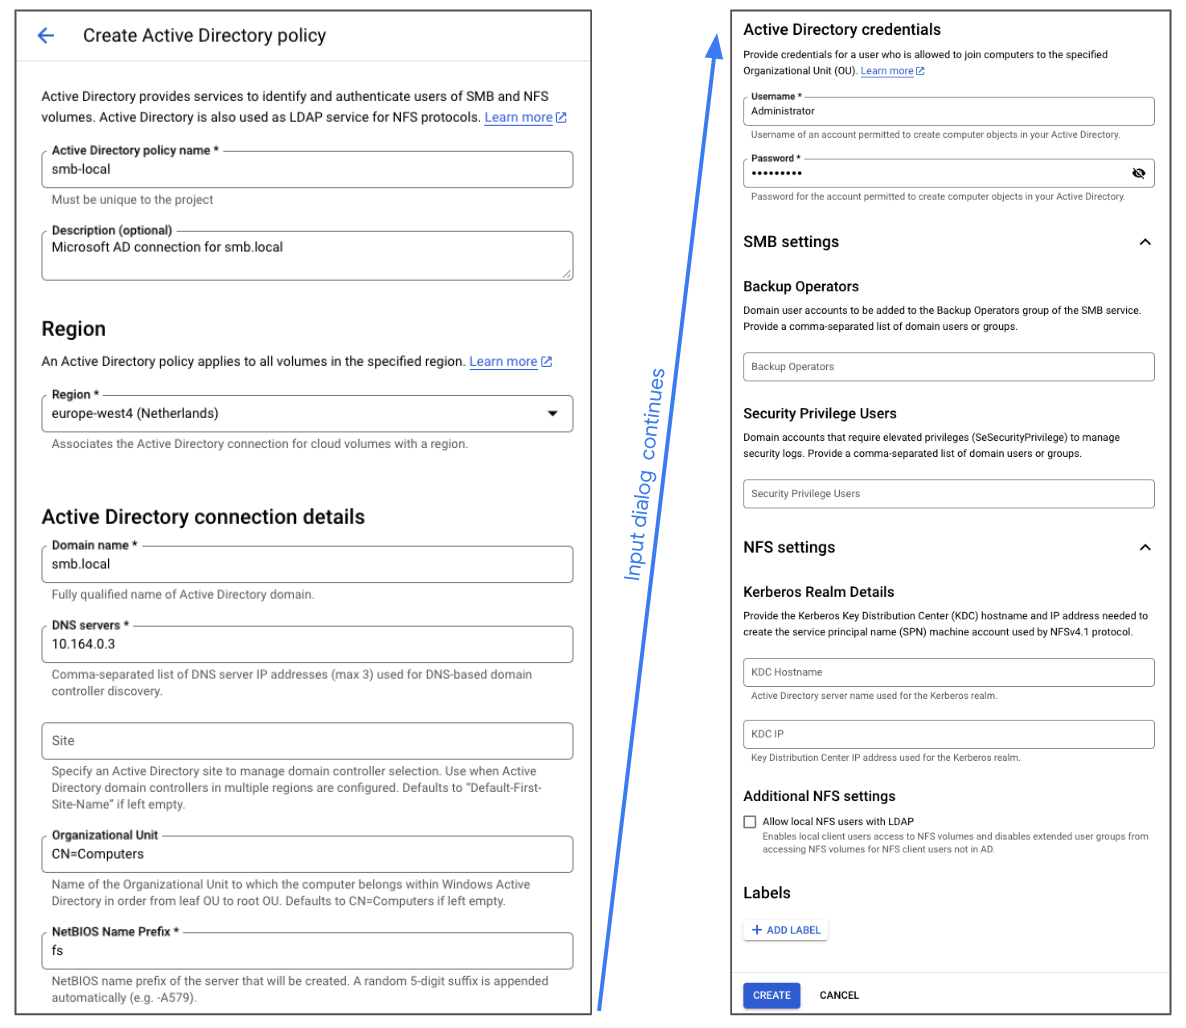
First we need to configure the AD settings. In this step you define the configuration for your Active Directory environment. Note that it doesn’t actually establish a connection and having a valid policy doesn’t actually mean that it will actually work 🙈. In Cloud Console go to NetApp Volumes, and then Active Directory policies, and then Create. The input fields are fairly intuitive and you can find the values from your earlier configuration steps:
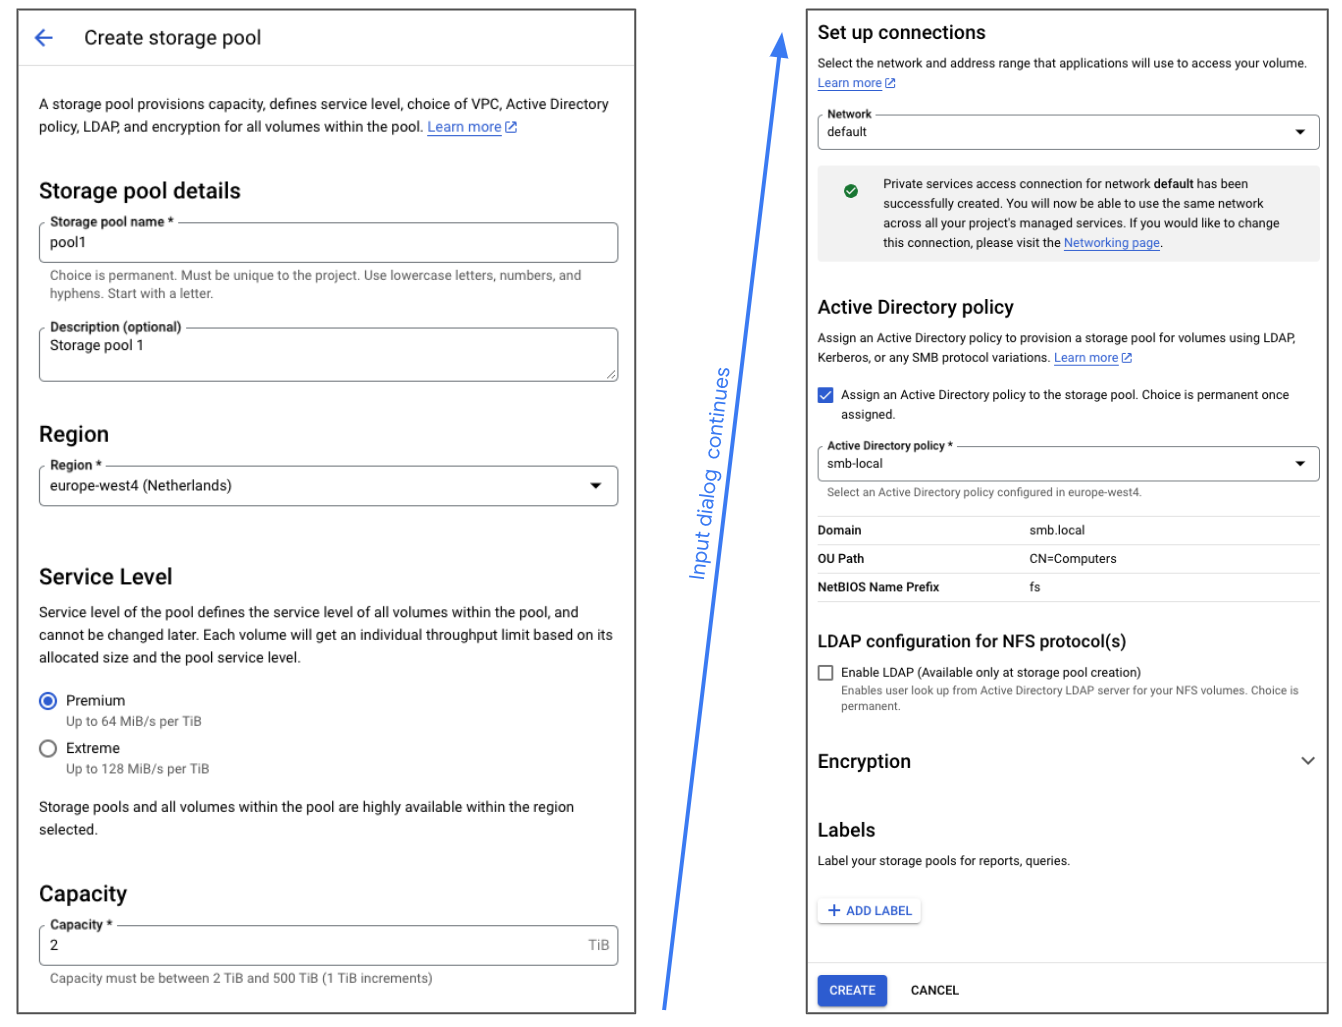
Next we need to create a Storage pool. A Storage pool exists in a region, has a service level and capacity, is connected to a VPC, and is assigned an Active Directory policy. To configure a new Storage pool click Storage pool and then Create.
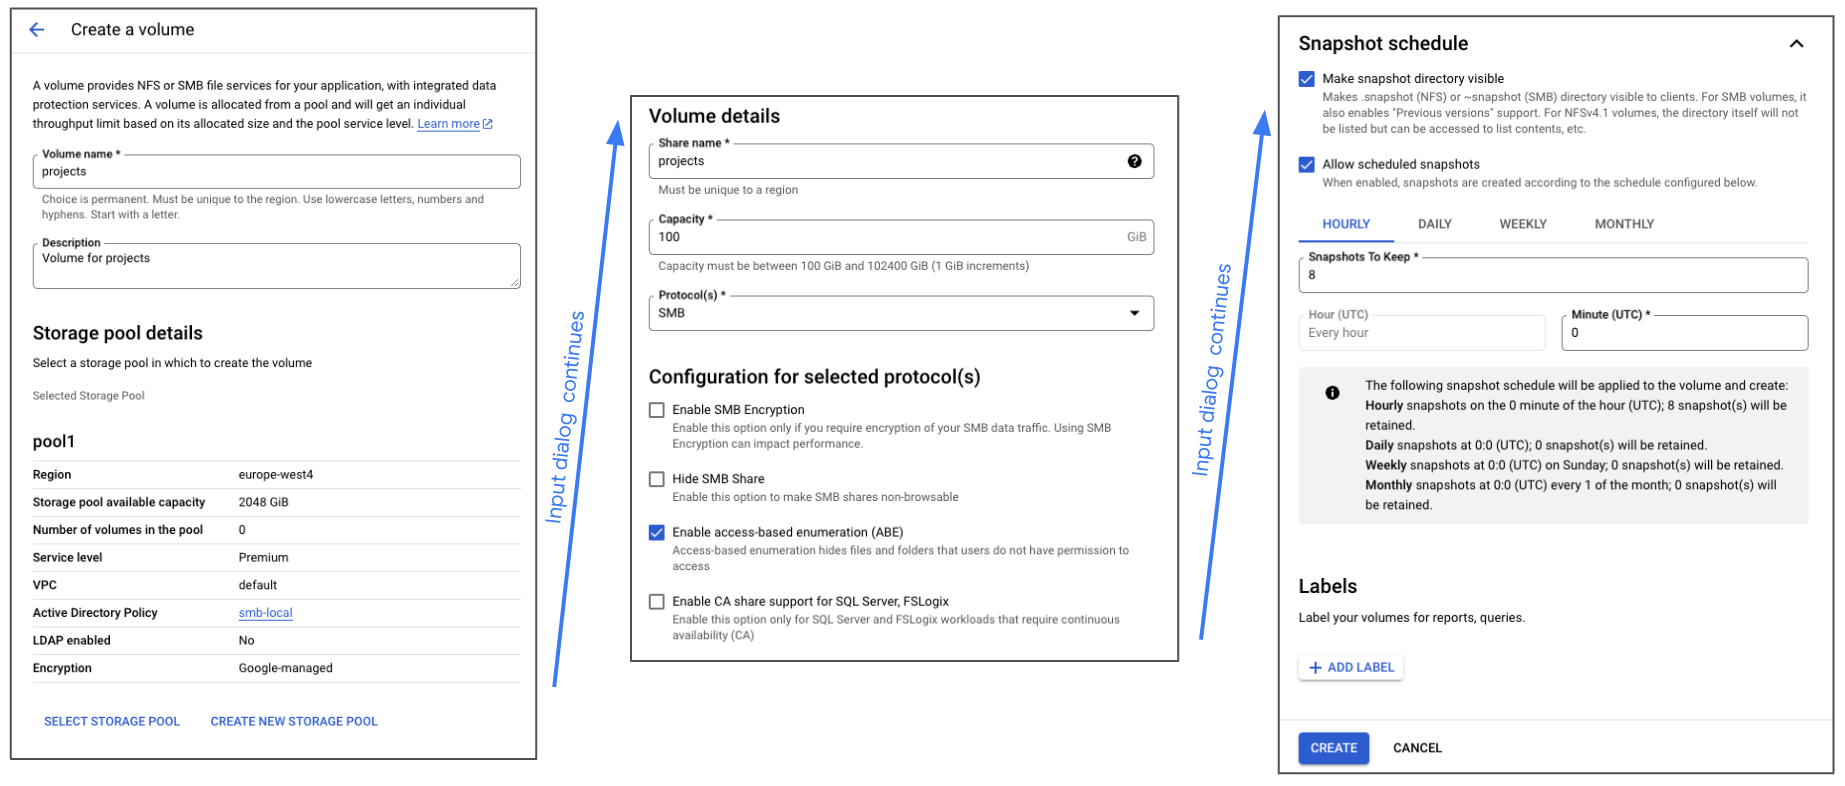
Finally, it’s time to create a volume on the Storage pool. A volume has a capacity that consumes space from the Storage pool, has a share name, and can be presented out on different file protocols. When creating a SMB share there are a few more options you can try out. Under snapshots I recommend you set a basic schedule and make the snapshot directory visible so your end-users can restore data easily. To create the volume go to the Volumes tab and then Create:
The first SMB volume may take a few minutes to create because in the background a connection from NetApp Volumes to your DC needs to be established, and a computer account for the file server created. Once it completes, check the mount instructions here:
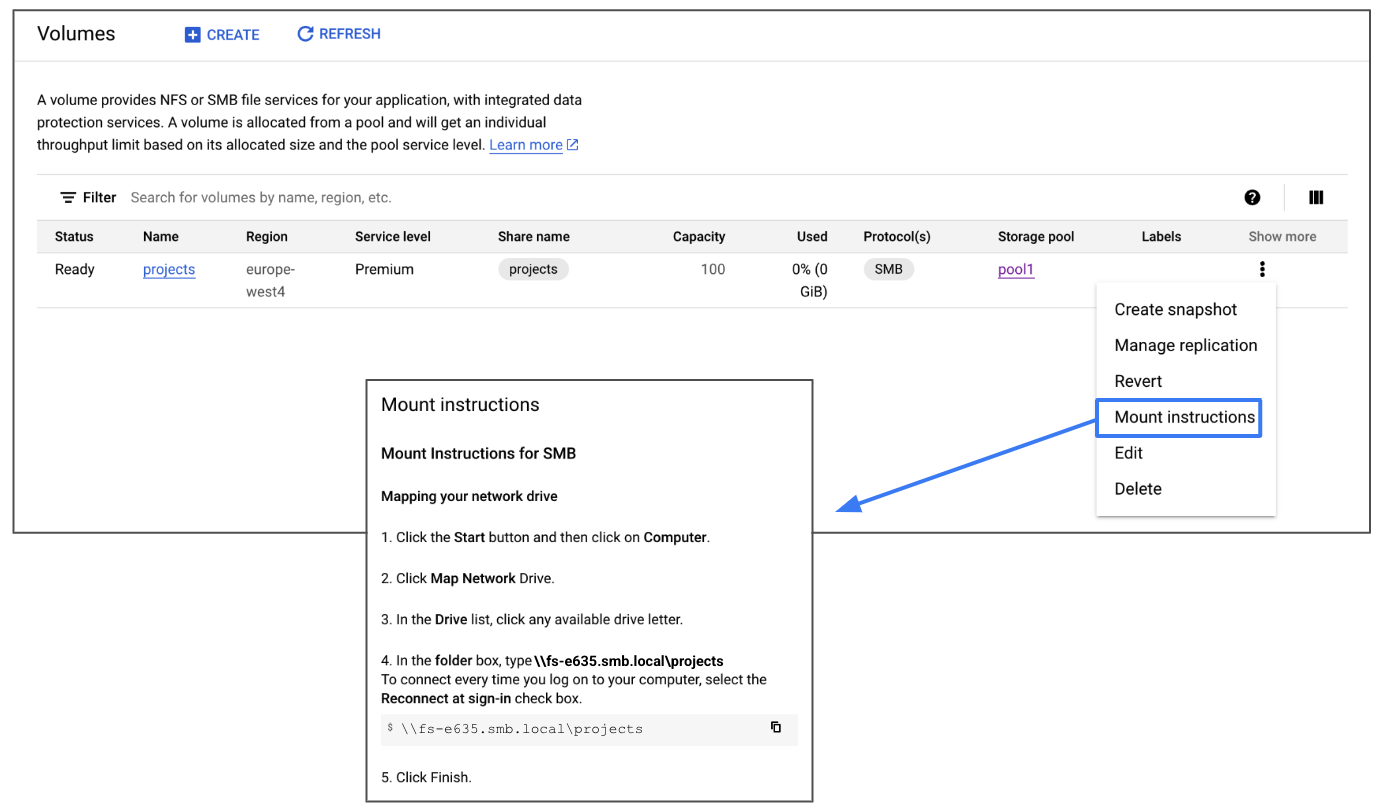
In your RDP session, mount the share! 🎉 🍻:
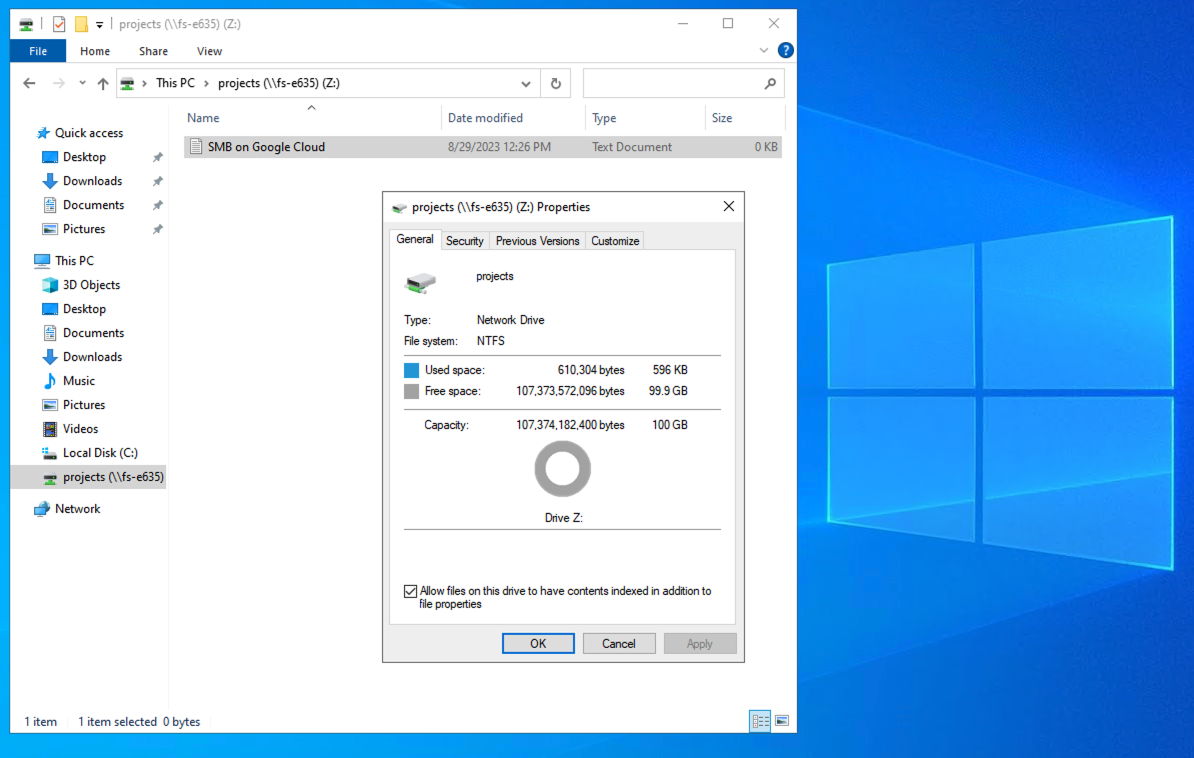
I hope this step-by-step guide helps you to understand the individual steps needed to use the NetApp Volumes service, from zero to hero!
If you’d like to keep going, I suggest creating a Windows Server client VM and testing from it as well. To do this create another Windows Server VM, reset the user password, bring up an IAP tunnel to its RDP port, and connect to it using RDP. Then join that new VM to the AD Domain you created (which works because of the DNS forwarding rule!) and allow it to reboot. Thereafter you can re-establish an RDP session using your domain credientials and mount the share just like you did from the DC directly.
As always, comments are welcome!
