A Google Cloud Storage (GCS) bucket is accessible to all internet and Virtual Private Cloud (VPC) network client requests that include valid credentials. To further restrict access based on source IP addresses configure the Bucket IP filtering feature. When enabled, only requests from permitted IPv4 and/or IPv6 address ranges for internet and VPC traffic are allowed, and all other requests are denied.
In this blog I will demonstrate how to use bucket IP filtering feature and recover from a situation where you have been locked out. For simplicity I will set the bucket to be public, but the IP filtering concepts are the same for a non-public bucket. I assume you already have a test project with billing enabled and have enabled the Compute Engine API using the default VPC network.
Define variables
We will use the Cloud Shell for many tasks. For ease of use define some helper variables. Note, if your Cloud Console session gets disconnected you will need to run these again after reconnecting. TIP: start two Cloud Shell tabs and in the 1st one run the top command, and then use the 2nd one for the commands in this blog. Running top in the first tab seems to prevent the shell from disconnecting. 👌
Open Cloud Shell from the Google Cloud Console.
Set variables for your environment including project, region, and bucket names accordingly:
PROJECT=gcs-20241202
REGION=europe-west1
ZONE=$REGION-b
BUCKET=ipfilter-20241202
GCPUSER=$(gcloud auth list --filter=status:ACTIVE --format="value(account)")
Set the default
gcloudproject so we don’t need to supply it on each command:gcloud config set project $PROJECT
Create and test with a public bucket
In the first set of steps create a bucket, set it public, and upload a test file. This is the default behaviour of GCS where there are no network client IP address restrictions resulting in this configuration:

Create bucket, make it public, and upload a test object
From the Cloud Shell create a new bucket and upload a test object.
Create a bucket.
gcloud storage buckets create gs://$BUCKET --location=$REGIONMake the bucket public:
gcloud storage buckets add-iam-policy-binding gs://$BUCKET --member=allUsers --role=roles/storage.objectViewerCreate a test object:
cat << EOF > hello.txt
Hello World!
EOF
Upload the test object to the bucket:
gcloud storage cp hello.txt gs://$BUCKET --cache-control=no-store
Test access from the Internet
Verify access to the object from various network locations.
Print out access commands / URLs so we can verify access from other network client locations:
echo -e "\n"
echo "Use from terminal: " curl -s https://storage.googleapis.com/$BUCKET/hello.txt
echo "Use from browser:  " https://storage.googleapis.com/$BUCKET/hello.txt
echo "Use from browser:  " https://tools.keycdn.com/performance?url=https://storage.googleapis.com/$BUCKET/hello.txt
Cut-n-paste the first output above and verify access from Cloud Shell. Next, click the second from the output above and observe the file can be opened from your web browser. Lastly, click the third from the output above, then the blue Test button, and you should see the file is accessed from a variety of locations on the Internet with a 200 OK HTTP Status code.
Test access from your VPC
Create two test VMs (node-allow and node-deny) in your VPC and verify the object can be accessed.
From Cloud Shell, create two VMs:
for ID in allow deny; do
gcloud compute instances create node-$ID \
--machine-type=e2-micro \
--shielded-secure-boot \
--network-interface=stack-type=IPV4_ONLY,subnet=default \
--project=$PROJECT \
--zone=$REGION-b \
--scopes=https://www.googleapis.com/auth/devstorage.full_control,https://www.googleapis.com/auth/logging.write,https://www.googleapis.com/auth/monitoring.write,https://www.googleapis.com/auth/service.management.readonly,https://www.googleapis.com/auth/servicecontrol,https://www.googleapis.com/auth/trace.append \
--create-disk=auto-delete=yes,boot=yes,mode=rw,size=10,image-project=ubuntu-os-cloud,image-family=ubuntu-2404-lts-amd64,type=pd-standard
done
Allow ingress traffic from all IP addresses that IAP uses for TCP forwarding.
gcloud compute firewall-rules create allow-ssh-ingress-from-iap \
--direction=INGRESS \
--action=allow \
--rules=tcp:22 \
--source-ranges=35.235.240.0/20
In Cloud Console, click the Connect SSH to open new terminal sessions to each VM.
From each VM, run the
Use from terminalcurl command from above to verify the file can be fetched from each VM.
We’ve verified that the object can be read from Internet and VPC clients. Now we can configure Bucket IP filtering!
Apply Bucket IP Filter for an Internet network client
Set a Bucket IP Filter and allow a single host resulting in this configuration:

Configure permissions and roles
Bucket IP filtering introduces several new IAM permissions that are not included in the existing default roles. We need to add and bind these to our user, and then create and apply the IP bucket filter itself to allow only our browser’s IP address.
From Cloud Shell, create a new role that allows management of Bucket IP filtering
gcloud iam roles create gcs_ipfilter \
--project=$PROJECT \
--title="GCS Bucket IP Filter Management Role" \
--description="Allows setting IP filters on buckets" \
--permissions=storage.buckets.setIpFilter,storage.buckets.getIpFilter \
--stage=GA
Bind the Bucket IP filtering management role to your user:
gcloud projects add-iam-policy-binding $PROJECT \
--member="user:$GCPUSER" \
--role="projects/$PROJECT/roles/gcs_ipfilter"
Configure Bucket IP Filter on the Internet IP
Get the Internet IP address used by your web browser, for example by visiting ifconfig.me
From Cloud Shell, set it as a variable:
CLIENT_IP=<your browser IP>Create your Bucket IP filter config; check the docs for full syntax:
cat << EOF > allow-client-ip.json
{
"mode": "Enabled",
"publicNetworkSource":
{
"allowedIpCidrRanges": ["$CLIENT_IP/32"]
}
}
EOF
Apply IP Bucket filter to our bucket:
gcloud alpha storage buckets update gs://$BUCKET --ip-filter-file=allow-client-ip.jsonUsing Cloud Shell, show the commands to check reachability:
echo -e "\n"
echo "Use from terminal: " curl -s https://storage.googleapis.com/$BUCKET/hello.txt
echo "Use from browser:  " https://storage.googleapis.com/$BUCKET/hello.txt
echo "Use from browser:  " https://tools.keycdn.com/performance?url=https://storage.googleapis.com/$BUCKET/hello.txt
You should see that the file is still accessible from your browser, but is no longer accessible from either the terminal or the CDN testing site. Additionally, from the terminal (Cloud Shell or your VMs) you’ll see the error There is an IP filtering condition that is preventing access to the resource. Because the Internet IP address of your web browser is allowed you will still be able to manage the bucket from the Clone Console UI.
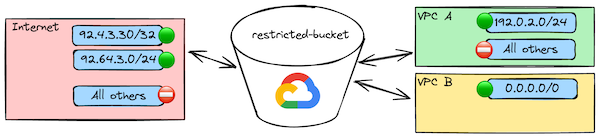
Allow access to an Internet network and VPC network IP address
Expand access to allow one of our VPC VM IP Addresses resulting in this configuration:

Expand Bucket IP Filter to one of the VPC VMs
When a Bucket IP filter is applied all access is blocked for Internet and VPC clients unless expressly permitted. Let’s add one of our VMs on the VPC for access.
Using Cloud Shell get the IP address of the
node-allowVM and save it to a variable:ALLOWIP=$(gcloud compute instances describe node-allow --zone=$REGION-b --format='value(networkInterfaces[0].accessConfigs[0].natIP)')Create a new Bucket IP filter file which includes both the Internet IP and the VPC network
node-allowVM; check the docs for full syntax:cat << EOF > allow-client-and-vpc-ip.json { "mode": "Enabled", "publicNetworkSource": { "allowedIpCidrRanges": ["$CLIENT_IP/32"] }, "vpcNetworkSources": [ {"network": "projects/$PROJECT/global/networks/default", "allowedIpCidrRanges" : ["$ALLOWIP/32"]} ] } EOFApply it:
gcloud alpha storage buckets update gs://$BUCKET --ip-filter-file=allow-client-and-vpc-ip.json

Updating gs://ipfilter-20241202/...
ERROR: [[email protected]] does not have permission to access b instance [ipfilter-20241202] (or it may not exist): There is an IP filtering
condition that is preventing access to the resource. This command is authenticated as [email protected] which is the active account specified
by the [core/account] property.
Completed 0
Oops. While you can manage the bucket from your browser, Cloud Shell runs in Google Cloud on a VPC Network and is locked out. There are two options: (a) update the IP filter from the allowed Internet IP or (b) grant the user permission to be exempted from the IP filter for bucket configuration changes. To demonstrate the exempt scenario we’ll go with option (b).
In production it would be preferred to manage Bucket IP Filter from a well known client instead of Cloud Shell. Also, if exempting a user consider using Privileged Access Manager (PAM) to control just-in-time temporary privilege elevation for select principals, and to view audit logs afterwards to find out who had access to what and when.
Grant Bucket IP Filter exempt role and expand access to one of the VPC VMs
From Cloud Shell, create a Bucket IP Filter exempt role
gcloud iam roles create gcs_ipfilter_exempt \
--project=$PROJECT \
--title="GCS Bucket IP Filter Exempt Management Role" \
--description="Allows configuration overrides regardless of IP filters on buckets" \
--permissions=storage.buckets.exemptFromIpFilter \
--stage=GA
Bind this role to your user:
gcloud projects add-iam-policy-binding $PROJECT \
--member="user:$GCPUSER" \
--role="projects/$PROJECT/roles/gcs_ipfilter_exempt"
Apply the Bucket IP filter. If you receive an error, wait a bit for the IAM update to propagate and try again:
gcloud alpha storage buckets update gs://$BUCKET --ip-filter-file=allow-client-and-vpc-ip.json
Updating gs://ipfilter-20241202/...
Completed 1
Using Cloud Shell, get the command to retrieve the file
echo "Use from terminal: " curl -s https://storage.googleapis.com/$BUCKET/hello.txtRun that command on
node-allowand it will succeed, while onnode-denyand Cloud Shell it will continue to fail.
Remove Bucket IP Filters
Bucket IP filters can be disabled and cleared to revert to the default bucket configuration.
Using Cloud Shell, disable and clear Bucket IP filters:
gcloud alpha storage buckets update gs://$BUCKET --clear-ip-filterShow the commands to check reachability:
echo -e "\n"
echo "Use from terminal: " curl -s https://storage.googleapis.com/$BUCKET/hello.txt
echo "Use from browser:  " https://storage.googleapis.com/$BUCKET/hello.txt
echo "Use from browser:  " https://tools.keycdn.com/performance?url=https://storage.googleapis.com/$BUCKET/hello.txt
Cut-n-paste the first output above and verify access from Cloud Shell. Next, click the second from the output above and observe the file can be opened from your web browser. Lastly, click the third from the output above, then the blue Test button, and you should see the file is accessed from a variety of locations on the Internet with a 200 OK HTTP Status code.
Conclusion
Cloud Storage offers bucket IP filtering to limit access to buckets based on the source IP address of the request. It enables additional control and the ability to limit by IP range for both Internet and VPC network clients for more control.
As always, comments are welcome!