
Containers are the next big thing. Bigger than Virtual Machines. No question about it.
To learn about containers, Docker is the logical place to start. Docker Machine provides a Docker engine based environment that is point and click simple for your PC. It’s awesome. This is your first stop to get a taste.
Soon you’ll want more. Lots more. Your list of ‘things to check out’ will start to grow:
- Optimized Container Host OS: CoreOS, Atomic Host, Ubuntu Core
- Orchestrators: Kubernetes, Docker Swarm, Mesos and Marathon
- Platform as a Service: OpenShift
- Volume management: NetApp Docker Volume Plugin, NetApp Kubernetes volume provisioner ‘Trident’
- Infra: etcd, flannel, puppet, chef, ansible
- Container engines: Docker, Rkt, Intel Clear Containers
- and the list goes on…
The container ecosystem also moves fast. Keeping up with all this is nearly impossible, and unless you have a streamlined way to create/destroy container hosts there isn’t enough time in the day to do it. You could use the cloud, but this has other considerations (and costs) to it.
In this blog you will find instructions on how to create a small container lab / sandbox using a one or more retired production servers to allow you to play in a streamlined way.
The tech starts with CentOS 7 as the hypervisor host OS, then adds QEMU/KVM/libvirt on top, and finally CoreOS VMs with their native Docker as container hosts. Lets get started!
Prepare
- Find some old physical servers.
- Reserve some IP addresses, for simplicity in the same /24 network:
- One for each of your CentOS 7 physical servers (1-5)
- One for each of your CoreOS VMs (20+)
- Create DNS entries for those IP addresses, for hypervisor hosts like kvm1, kvm2, kvm3 and for container hosts like docker1, docker2, docker3, to keep connections simple.
Install CentOS 7 as our KVM hosts
I installed using a USB stick and my Windows PC:
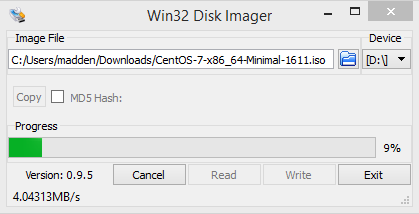
- Download the “Minimal ISO” to your PC.
- Download Win32DiskImager. Run the program and select the ISO file and the USB device drive letter and click Write:
- Stick the USB in a free port of your server and boot it. You will probably have to interrupt the boot at some point to select the USB drive as your boot device.
- Install CentOS normal. Most things you can leave with the default. The most important places to configure are networking, the installation location, timezone, and to set user credentials.
- For networking click the config icon from the home screen. First enter your hostname. Next select the NIC and then toggle the slider on the right side from OFF to ON so the interface will be UP at boot. Next click the configure button, go to the IP v4 tab, select Method: Manual, click add to enter IP details, then DNS server(s), and DNS search domains. Then save it.
- For storage you need to simply select the device and (automatic partitioning) and hit Done. If you get an error that not enough space is available you can ‘reclaim space’ which is essentially destroying existing partitions that were discovered by the installer. Since you want to reuse this server you can reclaim all partitions which should give the installer space to continue
- For timezone simply pick a city that is appropriate for your location
- Enter passwords. After you click “Begin Installation” and software is installing you can set credentials for two user accounts. Do it!
- After a few minutes you will see an installation successful message. Remove the USB drive, reboot, and the server should come up and be reachable on the IP address and credentials you set. Login via SSH as root (or become root using
sudo -i) and then continue. Setup SSH authentication so you can ssh commands between any CentOS KVM host without typing a password and never hit issues with SSH host keys changed (as can happen in a lab as you re-use IPs). This setup is NOT appropriate for production!
Create a new SSH key to be used for all KVM host access
ssh-keygen -t rsa -b 4096 -C "kvm" -f ~/.ssh/id_rsa -N ""Add the public key as an authorized key:
cat ~/.ssh/id_rsa.pub >> ~/.ssh/authorized_keys
chmod 0600 ~/.ssh/authorized_keys
Disable host key checking and use of a known_hosts file:
echo "StrictHostKeyChecking no" >> ~/.ssh/config
echo "UserKnownHostsFile /dev/null" >> ~/.ssh/config
Lastly, ssh to each other KVM host and copy the SSH config to it:
mkdir ~/.ssh; chmod 0700 ~/.ssh; scp INSERT-KVM-IP-HERE:~/.ssh/* ~/.ssh/.
Update all the installed packages to the latest levels:
yum -y updateStop and disable the default firewall, disable selinux, and reboot to make it all active to simply operation in a lab:
sed -i --follow-symlinks 's/^SELINUX=.*/SELINUX=disabled/g' /etc/sysconfig/selinux
systemctl stop firewalld
systemctl disable firewalld
reboot
At this point you have your CentOS host ready and need to install KVM on top.
Load QEMU/KVM/libvirt/kimchi on CentOS 7
To be able to run our CoreOS container host VMs on top of CentOS 7 system we will use:
- QEMU: Machine emulator and virtualizer
- KVM: Enables use of virtualization extensions provided by Intel and AMD processors
- libvirt: A Toolkit to manage virtualization hosts
- kimchi: A lightweight web GUI for your host and KVM VMs
Follow these steps:
Install a bunch of packages:
yum -y install qemu-kvm libvirt virt-install bridge-utils bind-utils \
virt-manager wget net-tools virt-viewer genisoimage epel-release
Start libvirt and enable it for autostart:
systemctl start libvirtd
systemctl enable libvirtd
Verify your installation:
[root@3-kvm3 ~]# virsh nodeinfo
CPU model:           x86_64
CPU(s):              2
CPU frequency:       2333 MHz
CPU socket(s):       1
Core(s) per socket:  2
Thread(s) per core:  1
NUMA cell(s):        1
Memory size:         4192208 KiB
And that you don’t have a message like this, in which case you need to enable virtualization extensions in the hardware BIOS:
[root@3-kvm3 ~]# dmesg | grep kvm
[    0.745756] systemd[1]: Set hostname to <3-kvm3>.
[   11.851827] kvm: disabled by bios
Enable bridge networking so that your container host VMs can have routable IPs on the same network as the KVM host.
- Identify the linux interface name for your active network connection using
ip a. Change directory into thenetworking-scriptsdirectory and then copy the config file for your active network connection to a new bridge config file: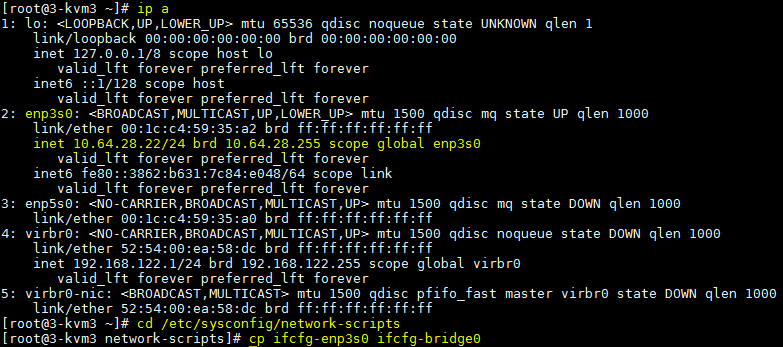
- Edit the
ifcfg-bridge0as follows (left is original, right is modified):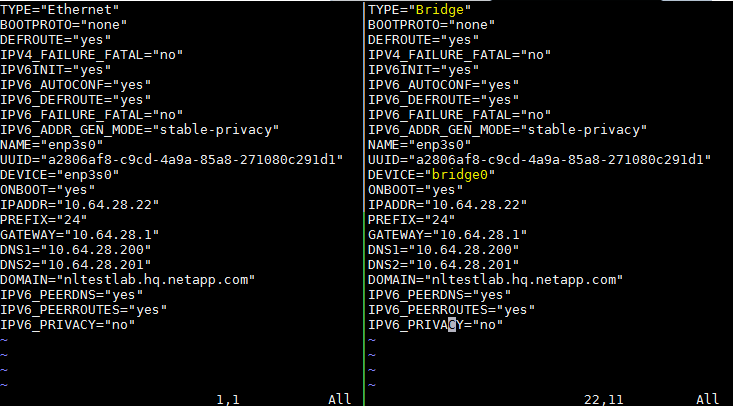
- Edit the
ifcfg-YOUR-INT-NAMEas follows (left is original, right is modified):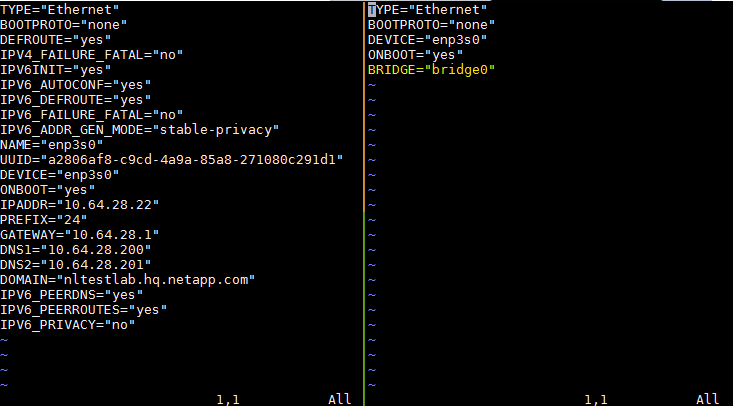
- Finally, restart networking and verify your fixed IP address is now assigned to the bridge interface, and that the physical interface is providing access to the bridge:

- Identify the linux interface name for your active network connection using
Install kimchi and set the web UI to auto-logout after 24hrs of inactivity:
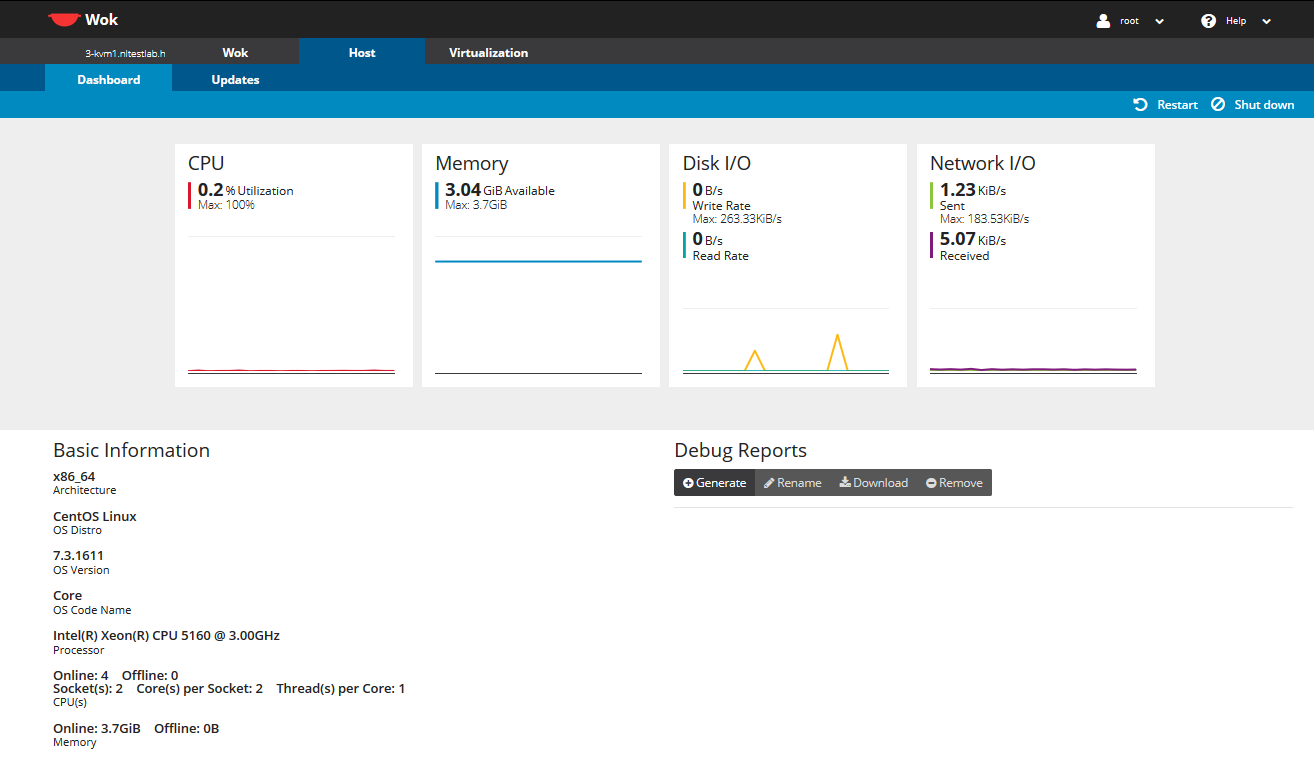
cd /tmp
wget http://kimchi-project.github.io/wok/downloads/latest/wok.el7.centos.noarch.rpm
wget http://kimchi-project.github.io/gingerbase/downloads/latest/ginger-base.el7.centos.noarch.rpm
wget http://kimchi-project.github.io/kimchi/downloads/latest/kimchi.el7.centos.noarch.rpm
yum -y install wok.el7.centos.noarch.rpm
yum -y install ginger-base.el7.centos.noarch.rpm
yum -y install kimchi.el7.centos.noarch.rpm
sed -i  's/^#session_timeout = .*/session_timeout = 1440/g' /etc/wok/wok.conf
systemctl enable wokd
systemctl start wokd
Go in your web browser to https://INSERT-KVM-IP-HERE:8001 and you will see a login page. Use your linux root credentials to login. Then click the Host tab and you should see something like this:
Prepare and install CoreOS on top of KVM
CoreOS is a barebones linux distribution designed specifically to run containers at scale. Some common linux features like the OS installer and a package manager are absent. On the other hand, container ecosystem software like docker, rkt, and etcd are included.
CoreOS is self-updating and does so for all components in an atomic manner using an A/B partition strategy:
- If CoreOS is booted from the A partition and a software update becomes available it will be automatically loaded onto the B partition and set as active.
- When the host is rebooted it uses the B partition and when a future software update becomes available it would be loaded on to the A partition.
- The A/B partition is mounted as the /usr filesystem and is read-only. Data stored outside of /usr will be persistent.
CoreOS uses cloud-config to set configuration details like user accounts, ssh keys, hostnames, networking configuration, and more, at every boot. This file can be loaded from a filesystem location, a mounted CDROM image, or fetched from a URL. The instructions on the CoreOS website for libvirt use a filesystem location pass-through by KVM (aka p9) but this feature is not available on CentOS so an extra step using an ISO was needed.
Follow these steps to setup CoreOS:
- SSH into one of your KVM hosts. Create or attach networked storage for the VM images, or use local disk and hope the IOPs are enough! For these instructions I used
/vm-storage. - Download CoreOS QEMU image:
	mkdir -p /vm-storage/coreos
	cd /vm-storage/coreos
	wget https://stable.release.core-os.net/amd64-usr/current/coreos_production_qemu_image.img.bz2 -O - | bzcat > os.img
- Create a cloud-config file using a template I created. Download user_data and save in
/vm-storage/coreos/user_data:
	cd /vm-storage/coreos
	wget https://gist.githubusercontent.com/dutchiechris/e5689a526d4651f6dec4880230fe3c89/raw/4576b956ab00430e644917f17080f4ccfd408615/user_data
	vi user_data
Edit the file as described below:
- Line 1: Must be
#cloud-configto be parsed - Line 3-5: SSH authorized_keys configuration. Update line 4 and 5 to include your public key(s); see step 4 from the CentOS installation session for how to find or create these. You can re-use the ones from your CentOS hosts, create another specifically for your container hosts, or do both like I did.
- Line 7: Sets the hostname. The
@@VMNAME@@is a placeholder and will be customized by a startup script to be explained later; leave this one as-is. - Line 9-11: Set a password for the
coreuser account to enable password authentication in addition to the SSH key authentication. Update the password on line 11 with a password generated usingpython -c 'import crypt,getpass; print(crypt.crypt(getpass.getpass(), crypt.mksalt(crypt.METHOD_SHA512)))'. - Line 14-15: Defines the update strategy and disables auto-reboot of CoreOS after it updates itself to avoid any surprise reboots
- Line 16-37: Sets fixed IP configuration and disables DHCP. On line 28 the
@@IP@@is a placeholder and will be customized by a startup script to be explained later; leave this one as-is. Modify line 29 and 30 to fit your lab IP network range.
- Line 1: Must be
Using the CoreOS image and cloud-config from above I wrote a script to ease roll-out of many copies of these. Download modify.py and save in
/vm-storage/coreos/manage.py:
	cd /vm-storage/coreos
	wget https://gist.githubusercontent.com/dutchiechris/98ba718278cca3c1b7ecbc546aad22f0/raw/a9b3707fd1fc6054b0e23ae308b473c0bec08fd1/manage.py
	chmod 755 manage.py
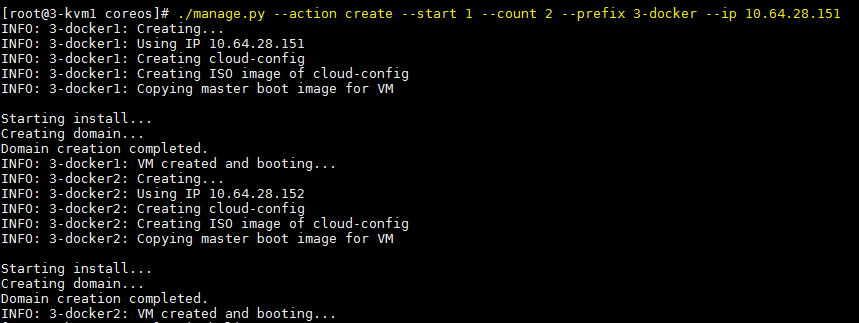
4. Review the script usage:
 [root@3-kvm1 coreos]# ./manage.py -h
usage: manage.py [-h] --prefix PREFIX --start START --count COUNT --action
                 ACTION [--ip IP]

Manage some container host VMs.

optional arguments:
  -h, --help       show this help message and exit
  --prefix PREFIX  Prefix hostname for managed VMs
  --start START    Suffix number for managed VMs
  --count COUNT    Count of VMs to manage
  --action ACTION  Action to take [create|start|stop|undefine]
  --ip IP          Starting IP address if creating VMs or keyword "dns"
Explanation:
--prefix PREFIX: sets the basename of the VM; i.e. lab-docker or lab--start START: sets the machine number to start with; i.e. 1 or 5.--count COUNT: sets the number of VMs to be managed incrementing from--start--action ACTION:createto create and customize a new VM copy from the master coreos and start it,startto start an already defined VM,stopto stop an already defined VM, andundefineto stop and undefine existing VM--ip IP: Sets the IP address to start from and will increment for each VM. For example if set to10.64.28.150and count is 5 then the 1st created would be .150 and 2nd would be .151, etc. If set todnsa DNS lookup for the hostname will occur and the IP will be used.
Run the script to create 2 VMs:
Check if the VMs are running and login the console of one of them:

Some helpful libvirt provided CLIs to run on your KVM host:
virsh list --all (show all defined VMs)
virsh console coreos1 (connect to console)
virsh start coreos1 (startup)
virsh shutdown coreos1 (nice shutdown)
virsh destroy coreos1 (hard power off)
virsh undefine coreos1 (remove config)
Check if Docker is working on your new container host VM by SSHing a
docker runcommand to your new container hosts:
Booyah! Pretty sweet, huh?
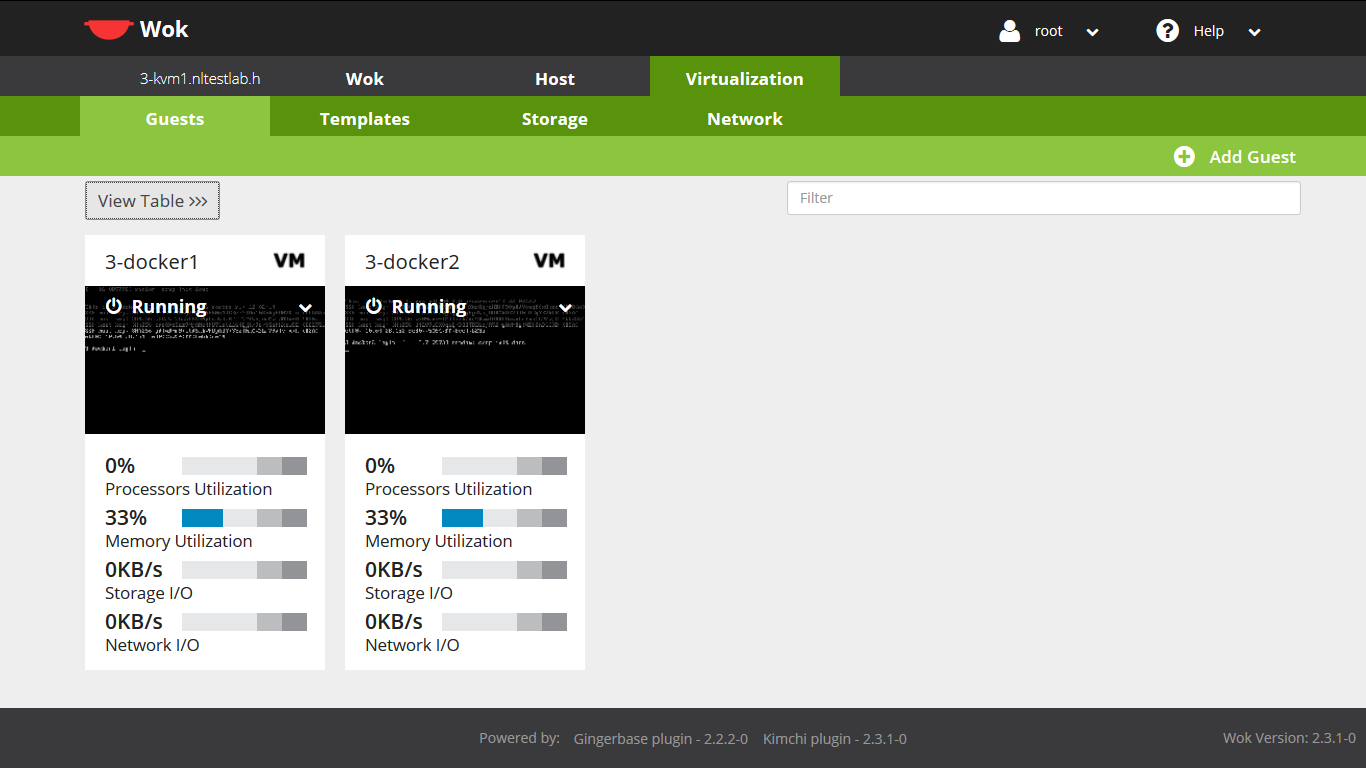
For the GUI equivalent experience go in your web browser to https://INSERT-KVM-IP-HERE:8001 and login as earlier. Now click the Virtualization tab and you should see something like this:
Click the options menu and choose to view console:

View the new browser tab and login using your credentials:

When you are all done you can shutdown/undefine them just as quickly as you made them:

Summary
After using these steps you have a container lab where in seconds you can create/destroy many container hosts so you can spend your time exploring the new tech [and not the infrastructure underneath].
In future blogs I will use this infra to explore various tech extending the list below:
As always, comments are always welcome!